Sunday, November 24, 2013

Across Five Novembers


Here we are, five years after beginning and we are almost finished. From the outside, it doesn't look like much has happened. In reality, all of the exterior plaster and paint is done. The most apparent difference is an apron of gravel (actually a dry river) around the entire perimeter of the house. This dry river will channel rain water down the rain chains through the gravel and away to landscaping features that will need supplemental water.


Progress over the years...
November 2009
November 2010
November 2011
November 2012
November 2013
By November 2014, we will be full-time Torrey residents. That makes us smile.

Saturday, November 23, 2013

Storage

--> Benjamin Franklin was a wise man, his inventions many, accomplishments extensive and writings numerous. He is also given credit for several familiar sayings including my favorite, “A place for everything and everything in its place.” I like this one best because it reflects the way I wish our all of our gear was organized. To that end, Scott spent last week building shelves in his office storage room. This is where we are determined to stash our gear in an organized fashion rather than allowing it to gradually settle into chaos.

In order to determine the necessary shelf depth, the first thing we did was to inventory the items to be warehoused in this space. After that, there were only two other considerations. To prevent damage to the plaster walls, we decided the shelves needed a back and sides. This will keep backpacks, lanterns, cameras, etc. from damaging the plaster wall when they are slid into place. We also do not want the shelves so tall that items placed on the top will show above the pony walls that separate the storage rooms from the rest of Scott’s office.

Here is the result of his effort.

Looking into the room from Scott's office.
A closer look in.
Looking straight at the shelves.
The shelves abut the plaster wall near the curved window well.
I think we'll be able to implement Franklin's directive here.

Monday, October 28, 2013

Two Week's Worth

--> My favorite part of a creating a list is checking off the items as they are completed. I’ve even contemplated adding “Make a list” to each one I compile so I’m able to check off something as soon as the list is written. It’s a thought.

Now that our construction to-do list is getting shorter and shorter, I’m compelled to make an accounting of everything we accomplish during each Torrey visit. Our most recent trip was fifteen days long. Here’s the list:

Completed Elfa closet
Completed dry river around house
Installed mechanical room door
Installed trim around mechanical room door
Moved all of the dirt piles away
Wrapped fruit trees
Winterized garden
Reinforced fence
Checked the yurt for holes
Removed bathroom fixtures from office bathroom in preparation for plaster
Finished lath in office bathroom
            (Repaired bathroom wiring after I put a staple through
             two wires and blew out the lights)
Checked smoke alarms
Planned bamboo fence to go around propane tank
Planned bamboo railing for bedroom
Wrapped exposed wires on solar panel
Planned pantry for living room
Staked future fence line between house and pasture
Staked future driveway

Built firewood rack and kindling box
Once all of that was done, we felt justified in going on a three-day llama trip.


We even went to our neighbors’ apple tasting party! We brought these Kerr crabapples from our trees in Logan. They were a hit!


Mechanical Room Door

--> I remember lengthy discussions related to the location of the mechanical room for the solar hot water system and radiant floor heating. I was worried about the amount of noise it might produce. I was worried about the size. I was worried about the appearance. I’ve been called a worrier, and I admit it in this situation. I was worried! When it came right down to it, though, there was no option. There was no other place for it except in our bedroom, right across from our bed. Like I said…I was worried.

However, now that we’ve spent a summer sleeping with this mechanical roommate, I realize that he is really a very quiet fellow. Now, even though he’s 10 feet tall and three feet wide, I hardly even notice him…except when Scott and I discuss the type of door we want to close behind him.

First we looked at an accordion door. You know, the kind that separates classrooms in a school or that divides conference centers into meeting rooms. We even found a fairly attractive possibility - Woodfold Doors.

Then I looked into building a frame and fabric door. There weren’t any satisfactory ideas on-line. And the size (remember that 10 foot X three foot dimension) was a problem.

We finally realized we wanted a door built in the same style as the other doors on the wall. But a 10-foot tall door would be a custom order. It is possible that could have been done, and I’m sure there is hardware that could support the weight of such a hefty guy. Still, to access the mechanical system, moving 10 feet of wood would be unwieldy, and the cost would have been prohibitive.

Eventually we discovered bi-fold doors at Accent Doors and Trim. This was an affordable choice because we could purchase solid wood doors in standard dimensions. Keeping visual considerations in mind, one door we would hang at the same height at the other doors on the wall by inserting a header about 80 inches above the floor. The second door, much smaller than the first, would have been an expensive custom order. Instead we purchased another solid wood door in standard dimensions. We would cut that door across the center panel and hang it from the top of the mechanical room opening.

The mechanical room prior to bi-fold door installation
The mechanical room after the lower door is installed
Scott completes the upper bi-fold door
Both doors in place
The entire bedroom wall showing all doors

As you can see, I’m now sleeping with another handsome fellow, even though number two is a giant. I’m not worried anymore.

Hanging a Closet

-->
In a straw bale house, a closet is a necessity that requires planning months, even years, before clothes actually arrive on move-in day. That’s because, unless one intends to purchase a custom-built. free-standing system, nailers must be imbedded into the straw and plaster so there is a strong, rigid platform to hold the screws that will eventually affix closet hardware to the walls.

Scott and I looked at several options and planned to use the closet and shelving  manufactured by Rubbermaid. We liked their adjustable FreeSlide shelving. Unfortunately, that system required the insertion of screws at regular intervals in the supporting verticals. This meant we needed to be fairly certain about our closet needs in order to place nailers in the correct places. At that point of construction, we weren’t ready to make such far-reaching decisions. Instead, we planned to use their Direct Mount product. It resembled the type of closet we already had in Logan. Even though it wasn’t elegant, we could work with it. 

Two summers ago, Scott notched the closet bales to accommodate nailers, screwing them to the bamboo supporting the bales. For future reference, before plastering, I held a measuring tape against the wall while Scott took photos in order to record the location of all nailers.


We’ve since learned that some folks embed nailers in a fashion that leaves them exposed. This makes it easy to locate them when it’s time to attached shelves, cupboards or other fixtures. All of our nailers are covered by plaster, so our photographic record was absolutely necessary.

This summer, as we prepared to complete the closet, our plans changed. While standing in our Torrey neighbors’ bedroom, we found what we had really been looking for all along. Ann and Robert used a product manufactured by Elfa and sold on-line by The Container Store.  After checking out the website and reviewing the installation guidelines and videos, we knew this was the company for us. No screws or nailers are necessary except those required for the top rail. All of the other components are supported from that rail.

To me, the great selling points included the on-line support for design, customizing, ordering and installation…plus their regular sales…up to 30% off of all closet and shelving components. We placed our order and waited for delivery.

We’ve just returned from two weeks of work (and a little play) in Torrey, whittling away at the several last things on our list, the first of which was to install that Elfa closet. We allotted two days for the project, but it was so simple, clothes were hanging the first afternoon.

To begin, we referred to our earlier photo record of nailer placement and drew a line marking the horizontal nailer that corresponded to the upper limit of the closet system.

Let me say that, after spending days, days, days and more days attempting to create beautiful plaster, seeing Scott drill a hole into this wall in order to place the upper rail of our closet was a disconcerting experience. After many gulps, deep breaths and counts to three, we overcame the emotional drama and proceeded with the project.

Screwing the upper rail into place.
The upper rail in place.

Attaching the vertical supports to the upper rail.
All four vertical supports in place.
Inserting shelf brackets
Aligning shelf brackets
Drawers and shoe racks in place
Shelf baskets, hanging rod and upper shelf in place
Scott's closet
Mary's closet

We love this closet! It seems like a perfect option for a straw bale wall. Now that we’ve lived with it for a short time, we plan to order a few more components during the December 24th sale.

Monday, September 2, 2013

Final Inspection

-->
We are not scofflaws by nature. However we have been living in our house while it has been under construction. It just didn’t make any sense to move everything back into the yurt when the water, bathroom and sleeping quarters (all heated) were nearly finished in the house.

So, to make everything legal, we asked the inspector to come back one more to time to give the stamp of approval and sign the necessary papers.

We can now "officially" move in and continue working on the long list of things to complete.

A Cork Floor

-->
In A Comedy of Errors, Balthazar said, “Small cheer and great welcome makes a merry feast.” He did, however, neglect to mention that it’s easier to be cheerful and welcoming if one has a kitchen in which to prepare an actual feast. After working toward that end for almost the entire summer, Scott returned to Logan from Torrey on Saturday with a smile on his face because, at long last, our kitchen is finished!

It was actually almost done on August 5th. Unfortunately a series of events caused a delay. The foremost of those events was a miscalculation on the amount of cork we needed to cover the floor. When we decided to use cork, we looked at several products and decided to purchase Cleopatra Chocolate Brown Floating Cork Flooring made by DuroDesign, a Canadian floor manufacturer whose Salt Lake City dealer is Underfoot Floors.

This is a pretty pricey product, but the color was exactly what we were looking for. In addition, according to DuroDesign’s website, “Cork is a completely renewable resource harvested as bark from living cork trees, never harmed by the harvest. Our cork flooring is composed of 100% post-industrial recycled content from wine-stopper production.” This was the product for us.

Unfortunately, because the product comes from Canada, the cost of shipping was almost as much as the actual cork. Yikes! Luckily for us, the folks at Underfoot Floors combined our order with another client’s order, and we were able to split the cost of shipping with them. Whew!

Everything arrived right on time. We carefully read and re-read the directions and went to work, following the instructions step by step.

 “Before installing DuroDesign Floating Floor, cover concrete floor with 6 mil polyethylene sheets, run up the wall 3”, overlap seams 8”, and tape the sheets together. Install plank over this moisture barrier.”

As we began setting the cork in place, we were careful to follow the official instructions exactly even though the instructions were a copy of a copy of a copy of a copy. Eventually we resorted to reading with a magnifying glass but finally went to the internet, which yielded easy-to-read directions.

We doggedly used the special tool provided by DuroDesign because of this warning: “IMPORTANT! To do this you will need a hammer and the SPECIAL DURODESIGN TAPPING BLOCK. DO NOT USE ANY OTHER TAPPING BLOCK. Using any other tapping block may result in damage to the cork wear layer.”

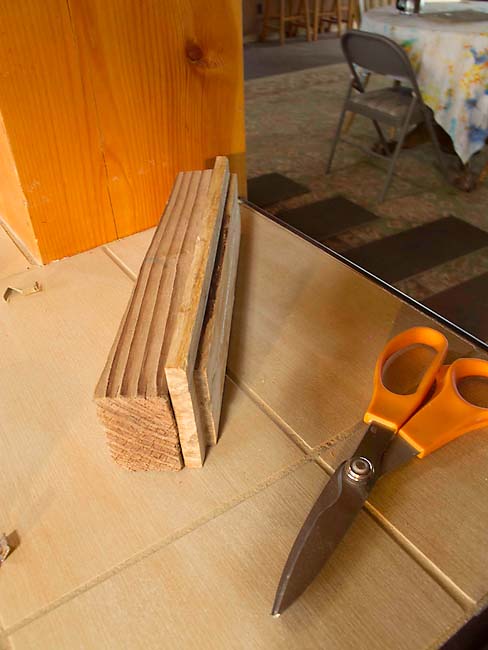
This is the “special DURODESIGN TAPPING BLOCK.” Only, because we could hardly use the special block without hammering our fingers, we had to modify it by adding a piece of 2X4 so we could actually hold the tool. There were specific instructions about labeling on the special DURODESIGN TAPPING BLOCK. “Using DURODESIGN tapping block and a hammer place block FLAT on floor, with the side up that is labeled: ‘This Side Up For Tapping On Groove’, tap on block gently until the ends of the two planks are firmly joined.”

Not only did we need to modify the “special” tool so we could hold it, there was no labeling to be seen. And the word “tapping” was an understatement. We had to “tap” with a mighty heavy hammer and with an alarming amount of force to get the pieces to click together.

As we neared the end of the project, it was apparent there were not going to be enough cork pieces.
We made zero mistakes and this was all that was left.
Unfortunately, we needed one more piece of cork to finish. The only time in the entire five years of building this house when we left the material estimation up to someone else and we came up short. (The folks at Underfoot had calculated for us from a detailed drawing of our floor plan.)

A terse phone call to Underfoot Floors registered our displeasure. Eric promised to quickly place an order to DuroDesign for three more pieces - three because we might need an extra piece or two for future repairs. And we left Torrey with an almost-finished cork floor.

One week ago Scott returned to Torrey. He stopped by Underfoot Floors to pick up the new pieces. The pieces were there, on time, with our name on them. They didn’t even ask us to pay for them. That went a long way to make us feel better about their miscalculation.

In the course of three days Scott installed the last piece of cork, washed the entire floor,

Applied the required four coats of polyurethane,

Made and attached all of the trim on the toe kicks,

And on the curved walls (before),

(after)

Manufactured a transition between the earthen floor of the living room and the kitchen and finally moved the refrigerator into place.

Kitchen complete. Let the small cheer, good welcome and merry feast begin!