Wednesday, July 28, 2010
Sunday, July 25, 2010
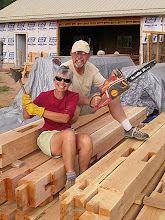
Not Building a Piano
Today we will finish the detail work on the the last of our eight trusses. Now we have all of the timber cut (and much of it fitted) except for the 48 purlins These are horizontal roof members spanning between trusses. The roof is attached to the purlins. Ever the optimist, I don't think cutting the purlins will take long. Scott says it will take forever because our wood has twisted a good deal since it was cut last fall. The reality is likely somewhere in between. We are hoping for a September frame raising. Fingers crossed...
Yesterday we took the tarps off of all the trusses in our yard. We were happy to see that, over the months, we have actually gotten better putting the pieces together. Even so, it is impossible for us to be as skilled as our tutors, Adam and Jake, who have been building timber frame structures for years. Scott says if anyone makes negative comments about our joinery, just tell them we weren’t building a piano.
 It was recommended that we seal all of our wood with Skidmore’s Liquid Beeswax. It is very expensive, and, when we opened the lid, we could see why. The amber liquid exudes the efforts of thousands of bees who couldn’t have know their work would be enshrined in the timbers of our house. And I couldn’t have known the effect this unguent would have on our wood.

When we applied the first brush strokes to one of our trusses, Scott said, “What do you think?” I said, “Now it looks like a piano!”
Yesterday we took the tarps off of all the trusses in our yard. We were happy to see that, over the months, we have actually gotten better putting the pieces together. Even so, it is impossible for us to be as skilled as our tutors, Adam and Jake, who have been building timber frame structures for years. Scott says if anyone makes negative comments about our joinery, just tell them we weren’t building a piano.


When we applied the first brush strokes to one of our trusses, Scott said, “What do you think?” I said, “Now it looks like a piano!”
The Last Hole
 We plan to heat our house with two systems: a Tempcast masonry heater and radiant heat flooring powered by solar-thermal collectors. The basic idea behind the solar-thermal system is to collect the sun’s energy with water-filled evacuated tubes on the roof and store it in a large thermal mass - a lot of water - enough water to store heat from sunny days through cold cloudy days. When we figured our budget for collectors and tanks, and our likely heating needs, 500 gallons turned out to be the required amount to efficiently run the system. Initially we could only find room for 300 gallons to be stored in a huge water tank in our bedroom closet. This would have taken up half of the closet space. We were not at all satisfied with this idea because our sweaters and sneakers were going to be displaced by an ocean of hot water. We hoped a better plan could be devised. We heard about an exterior underground storage tank used in a Wasatch Front house. Wayne, our architect, investigated that system, and Phillip, our plumber and solar thermal designer, drew up the details. Our better plan arrived in Torrey yesterday.
Dura-Crete, Incorporated is a precast and custom concrete manufacturer located in Salt Lake City. To store our ocean, they built a 21,000 pound custom concrete box-within-a-box insulated with reflective, woven fabric to store our 500 gallons outside of the house. This was preferable on four fronts: it was no more expensive than the closet storage option; we regained our closet space; we were able to get a more efficient amount of thermal storage and it got all of that water outside of the house...which is good plan for a straw building.
Why a box within a box? We will only need to have one hole dug to contain our entire system. The inner chamber will store the 500 gallons as well as three copper heat exchangers fabricated by Phillip. A smaller chamber (inside the big box but outside the inner water box) contains pumps that move the water through the solar collectors and into the house, plus sensors that control the system.
The link below is a slide show that will give you an better idea of what happened...everything from the moment Tyler began digging the hole to house the water tank with his backhoe to the moment Phillip climbed inside the manhole to install the pumps.
http://www.flickr.com/photos/34651952@N04/sets/72157624577201284/show/
Hooray! The last hole has been dug and will soon be filled. It is wonderful feeling to know that everything that happens from now on will be above grade.
Saturday, July 10, 2010
Construction Boot Camp
Back in 8th grade when I opted out of shop classes, I never would have guessed that I would be building my own house someday. While Scott already knew how to use tools and actually build things, I didn't know much about construction. As of today I now know how to use a router, a chain mortiser, chisels and mallets, a jigsaw, orbital and belt sanders, a disk grinder, Japanese saws, caulking guns, hammers, a pneumatic stapler, compressors, a drill, a miter saw and the tractor. Basically I can use everything except the big, scary circular saws.
I guess you could say that we are at Construction Boot Camp. We get up every morning and, just to make sure we remember why we are building a house here, we go for a walk or a bike ride. After breakfast we begin the day's tasks, take a short break for lunch and then are back at it until sunset. We celebrate our small successes as we cross each item off the list of the day.
Moving the timbers and the heavy tools can be challenging and we are both covered with scrapes and bruises, but each day takes us closer to our goal...a place to call home in Torrey. Not only that, I'm getting great muscles and I still have all of my fingers.
Today we finished the rest of the king posts. Tomorrow we'll complete the last eight braces for the king truss. Hooray! The whale is getting smaller and smaller.
Sunday, July 4, 2010
Three and a Half Inches

We must also create a barrier between any possible moisture and the straw. To do this we painted the top of the foundation with asphaltic emulsion and placed tar paper on top of it. Then we anchored 4 X 4 inch boards on each side of the 18-inch foundation for the sill plate. (This site has many definitions that help understand terms used in the construction of log homes. While our home isn't exactly a log home, the glossary is useful.) In order to be ready to raise the timber frame, the sill plate must be filled with gravel and the foundation needs to be back-filled. The straw walls will rest on the sill plate.
An aside - Even though lumber companies call the boards 4 X 4 inches, they are actually "nominally" that size. That means the boards are really only 3 1/2 X 3 1/2 inches. Once the sill plate was in place, our house was 3 /12 inches taller. Hooray! A small victory. The next upward step should be a big one...15 feet of timber frame.
Post Options
Subscribe to:
Posts (Atom)


")