Wednesday, June 19, 2013

Exterior Light Fixtures


Long before we even began erecting our yurt (and construction residence) five summers ago, I perused every strawbale book I could get my hands on. Each time I came across a feature I loved, I’d add it to my design notebook. Periodically I reviewed the pictures in order to remember what items I wanted to purchase should they go on sale.

Restoration Hardware had a sale on light fixtures at about the same time I was marking books. They had fixtures that were exactly the same as one I had bookmarked. I bought them immediately, and they have been waiting in storage until the time our walls were done.

This week, since the plaster and paint on the outside of the house are finished, Scott installed all seven lights. Each one can be turned on or off independently from the others. They are shielded from the night sky by our porch, and they are identical to the one I marked in that book four years ago.

Painting with Lime Wash

Once again, we’re arriving at lasts…this time the last exterior paint. This will be applied to the north and south bump-outs. This paint is a lime wash because we applied lime plaster to the bump-outs which have limited protection from precipitation. The questions arises – what color should we use?

On the south bump-out, we selected yellow ocher. We’ve used this color frequently throughout the interior of the house—we must really like it. We chose it for the south bump-out for a specific reason: the intensity of the southern sun. We have noticed that the dark frames of our windows become very hot in the midday sun and cool quickly at night. The thermal expansion and contraction of the frames have caused a small bit of plaster to slough off in several places. A large dark plaster wall would also be subject to increased thermally-induced movement. Therefore, we opted for a light color to minimize the expansion and contraction that occurs during the day and night  and across the seasons. Plus, the dark window frames in the pale yellow wall look fantastic.

Scott repaired the plaster with a commercial concrete patch mix with polymer additive to make it more elastic. He made an expansion joint at each problem area around the frames. Then we covered the south bump-out wall with a paint created from pigments we purchased from Capital Ceramics in Salt Lake City - a mixture of yellow ocher, ceramic brown and raw sienna. In addition to the pigments, the lime wash consisted of one part Type-S lime and three parts water.

 We were uncertain about the color for the north bump-out, so Scott mixed several colors and applied test patches.
We contemplated these for several days and decided upon eggplant (or aubergine in the world of color design). Aubergine is the darkest color in the set.

Two friends – Jean and Catherine - arrived just in time to help with all of the painting. After completing the south wall, they jumped right in on the north wall with three coats of aubergine.

Yikes! It wasn't the ugliest thing we had ever seen, but it wasn't working here. Scott said this color might be nice somewhere...but somewhere far from here. The coats seemed much lighter than the test patch, and, despite all our efforts to smooth things out, we could see every brush stroke. This wouldn’t do at all.  Scott declared that we were going to revert to our tried and true color – yellow ocher.

He mixed the same pigments as before – yellow ocher, ceramic brown and raw sienna with a slightly greater proportion of ceramic brown – and we did the entire wall over again with much better results.
With patience, stick-to-it-iveness and friends, you can do anything.

Painting with an Aliz


We’ve built our walls with two types of plaster – earthen plaster made from the beautiful southern Utah red earth on our building site and lime plaster created by combining type-S lime, sand, pumice, kaolin clay and soda ash. The earthen plaster is on the walls which are completely protected from weather by our 8-foot-deep porch. Lime plaster covers the walls of the north and south bump-outs. In both places, an 18-inch (about) overhang provides some protection from precipitation, but that is not enough to keep direct rain from the walls. These walls need a material that won’t melt in the rain. We remember the melting witch scene from the Wizard of Oz and don’t want a melting wall scene in Torrey.

Each type of plaster requires a different paint. Earthen walls receive a clay paint called aliz (alis). Lime walls receive a lime wash.

We wanted the walls under the porch to be the same color as the natural Torrey earth. To produce this, we wanted smaller particles of clay, so we sifted our 1/8-inch screened clay to even finer particles through one of our sieves.

Next we combined water with what Scott calls his special polyvinylacetate polymer additive. He means Elmer’s white glue.
Then we combined the sifted clay with the water/glue mixture.
Painting the walls with this aliz went very quickly and resulted in a wall with a strong finish in a color exactly matching the landscape that surrounds us.

Final Exterior Plaster

-->
This is destined to be a summer of lasts. Typically lasts and goodbyes are not my favorite moments. I’m much more comfortable with firsts and hellos. However, the lasts of this summer are ones we’ve been looking forward to for a long time.

Take last week for example. We needed to add the very last coat of exterior plaster. If we went by the book, that would have meant ¼ inch of finish coat over the 2nd layer that’s been on the house since last fall. In our case, because our walls have undulations, some of which are significant, that final ¼ inch of plaster has been as great as one inch in some places. Our goal? To make the straightest walls possible while, at the same time, keeping the earthy, hand-made character of a straw bale house that we love so much.

Scott has spent more time with plaster than I have. Here he applies that ¼-inch layer that books talk about.


His small Japanese pool trowel was his favorite tool.

I really got into it.


After four long days of work, that last coat brought the walls to their full depth. As you can see, the windows are now flush with the walls. It looks finished.

I applied the very last handful of plaster.
The exterior plaster is complete. It is a fond farewell. The next step...painting all of the exterior walls.

Wednesday, June 5, 2013

Bathroom Countertop

Our tile masters, Doug and Shanna, are in Italy this summer. Besides missing them dreadfully, we are also on our own for so many of the finishing details. This includes all of the challenges that come with tiling countertops.

I was involved, although minimally, in the tiling of our bathroom shower with the artists, Doug and Shanna. I basically watched. And Scott and I did tile the bathroom floor together last Thanksgiving. Therefore, we decided it would be within the scope of our limited abilities to tile the bathroom counter, so we went to work with the design and installation of said countertop.

I wanted to tie the design to that of the shower, so, once again, we employed the use of the small glass mosaic tiles we found previously at Home Depot. In order to select an appropriate field tile, we attempted to match the darkest brown in the shower tile as well as the dark brown in the hickory wood of the cabinets. Contempo Tile in Salt Lake City had exactly what we needed. An order was placed and received, so we went to work. In less than three days, the project was completed, although not to the caliber of Doug and Shanna.

Using a jigsaw to cut the sink hole
Screwing the 3/4-inch exterior plywood to the counter
Adhering the cement backerboard to the plywood
Covering the counters and floor with protective plastic
Beginning the mosaic backsplash
Backsplash is finished
Beginning the field tiles
The last piece
Taping the walls before caulking
Scott and I installed the sinks and faucets. Phillip will hook up the water. The folks from Jones Paint and Glass will hang the mirror within the week, and we will put in the lights. Scott said the master bathroom will be the first room to be completely finished except for maintenance and remodel. I’m certain there will be no remodeling in our future.

Waiting for water and mirror

How Do We Know?

Years ago,when we first talked about building a house, I explained to Scott that it was not possible for me to live in the midst of a construction zone and that I wouldn’t be able to move to Torrey, on a permanent basis, until the house was “done.”

Four summers have passed, and we are now beginning summer number five. So many of the big part s of construction are finished. When I look around me now, I’m surrounded by, well, a house. So how do we know when it’s no longer a construction zone and is ready for full-time habitation?

For starters, the old and very used refrigerator that was once ensconced in the garage, is now abandoned and is presently awaiting a return trip to Logan to be turned in to the local utility company for a $35 rebate.
With much care and with the help of our tractor, we moved the new fridge from the garage to the house where it temporarily stands in the living room, waiting for the floor and counter top in the kitchen to be completed. Soon it will take up its permanent position within the kitchen triangle so prominently discussed in all of the kitchen design books I’ve read.

Scott said we are definitely passed the construction boot camp stage of building since we can actually raid the refrigerator in the middle of the night without having to traipse across the property, dodging mortar mixers, pools of water and piles of dirt to get to the fridge in the garage.

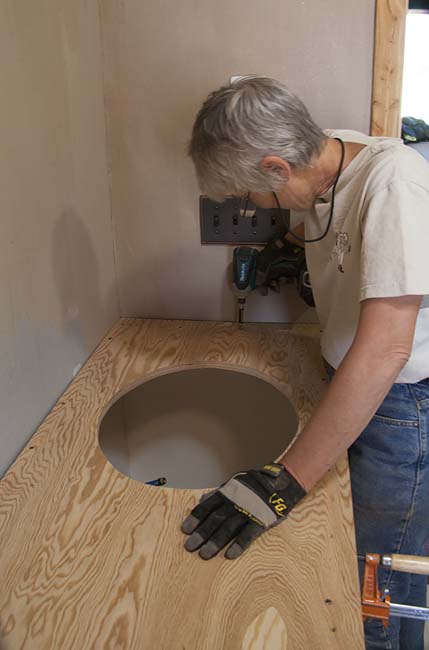
To me, though, one of the most telling signs was the installation of our oven. For four full summers we have been unable to bake anything other than an occasional but mouthwatering peach cobbler in the dutch oven. Scott and our electrician, Trent Hunt, recently installed our oven.
The very next morning I baked muffins...
and we enjoyed breakfast at a dining room table with a new rug under our bare feet.

We know we’re getting close.

Help From the North

Our good friends from Logan, Bryan and Jean, arrived to help us again. I don’t know why they keep coming except for the fact that they are, indeed, good friends. Every time they are here, we have a long list of things for them to work on, and most of the items on the list are not very much fun. That’s why they are on the visitors list.

This time Bryan and Jean cleaned and organized our garage. Jean helped take a huge load of garbage to the dumpsters set up at the town hall for community clean up days. Bryan painted the porch bench with beeswax. When they were finished, for one brief moment, there was even room for a car in the garage.

Meanwhile, Scott participated in a little deconstruction by removing the old test color palette from the side of the garage. Does this mean there is a finished future for the garage as well?

The best part of Bryan and Jean's visit was their good company and the hike we took together to the petrified wood “forest” just outside of town.

Before we knew it, they completed the list and were off to work on projects of their own.