|
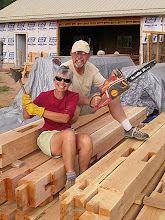
| John places bale at top of wall |
 |
| Riley transfers bales to building site |
Last week, with the help of family and friends, we finished stacking all of the bales. They had been sitting in our garage since last summer and were certainly making themselves at home in that comfortable, dry space. The great thing about that storage site is that we knew exactly the conditions under which the bales would winter: no mice, no moisture, no sad stories. The challenging things about that storage site were they took up all of the space in our garage and we had to move the bales again - from the garage to the house. (Many times during our research it was recommended that bales be delivered to the building site and stacked directly where they would be used. This removes the necessity of moving bales so many times.) Nevertheless, we now have a building made of straw, but it’s not a house...yet.
 |
| Scott checks the wall to see if it is level and plumb. | | | | | | |
 |
| Using a weed trimmer, Riley smoothes the wall’s surface. |
There are many next steps but we decide to begin playing around with plaster a bit. Our printed references include Scott’s notes from our workshop with Bill and Athena Steen plus the book entitled Using Natural Finishes: A Step-by-Step Guide by Adam Weismann and Katy Bryce. Both are proving to be invaluable.
First we set up our plaster mixing station. This consists of a mortar mixer, a large sorting screen used to sift the earth from our building site into piles of 1/4 minus particles, piles of earth to be sifted, shovels, mason’s sand, a water source, a wood chipper, straw, a wheel barrow, a mixing table, large cement mixing tubs, several white buckets and many pairs of rubber gloves.
 |
| Riley moves earth to the mixing station. |
 |
| Doug and Scott shovel earth through the sorting screen. |
We experiment with our soil to make a clay slip. (This clay slip is the basic ingredient in all of the future plasters we’ll be working with.) Using Torrey clay soil, we need a mix of 4 parts water to 7 parts soil.
Adding long, unchopped strands of straw to the clay slip, we create light clay straw which used to fill all of the empty spaces between the bales and between the bales and the framing timbers.
Scott begins filling gaps between bales with straw clay.
Before we work on other walls, we want to create several different mixes of plaster in order to determine the best “recipe” for the first layer. Some sources call this layer the scratch coat. When we are completely finished, every wall will be covered with approximately two inches of plaster. This first coat will be about one inch thick. The main purpose of the scratch coat is to get a bunch of mud on the wall and fill in the major irregularities in the surfaces of the walls. The success of the last layers of plaster depends on this foundation coat. It must stick to the walls and it mustn’t crack. Once it’’s on the walls, we’ll put scratches in its surface, hence the name “scratch coat.” This scratching will provide a surface that can support and hold the next layers of plaster.
 |
| Scott and Riley add straw to chipper in preparation for mixing a plaster "recipe." |
 |
| The chipper transforms the long straw into small, fairly uniform small pieces. |
Soon we will use this chopped straw, sand and clay slip to create the scratch coat.


")