Wednesday, June 29, 2011

Straw

After all of this time and planning, we are finally working with straw! It seemed as if this moment would never arrive, but here we are with bale number one in hand.

Before this first bale could be set in place, we attached burlap to all of the exterior timber frame surfaces that will have plaster against them. We did this because plaster and wood don't really like each other very much. They'll sit together quite nicely for awhile, but, as time passes, the plaster dries and contracts a bit leaving small gaps between itself and the wood. These gaps could eventually become conduits for moisture to enter the bales, and this is a big problem in the straw bale world. We love new experiences, but this is one we would like to skip. The burlap will act as a relationship reinforcer. When we get to the plaster stage (which isn't far away - hooray!), that burlap will be pressed into the first layer of plaster which will give strength to the bond, thus reducing the chance of future separation.

Next we pounded 12-penny nails part way into the sill plate at four-inch intervals. The nails stand about two inches above the sill plate in a zig-zag pattern. As the bales of straw are set in place, the heads of the nails dig into the bottom of the bales and provide a very strong hold. This prevents the bales from moving off of their foundation.

It's surprising to see how quickly the straw bale phase of the building goes. In just four days, a handful of people have completed almost half of the wall installation. Most of the work in done in pairs which change as needs change. Shanna, Doug, Scott and Riley have done most of the straw bale work. This involves stacking bales, retying them to fit the space, notching bales to fit around posts, tying bales to the timber frame with eye screws, and shaping bales to provide curved surfaces at the window and door openings.

Scott and Doug place eye screws into timber frame posts.
 Scott tamps the first bale securely onto nails in the sill plate (or toe up).
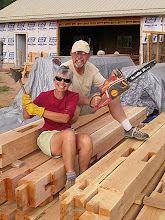
 Scott shapes a bale with our precision chain saw.
Riley tamps a bale into place.
Doug takes a moment to evaluate.


As a section of wall is completed, bamboo poles are attached to the wall at the base of the sill plate and at the ceiling. We used conduit straps at the bottom and drilled holes in the ceiling at the top. The poles are placed directly opposite each other on the inside and on the outside of the wall. Using a bale needle and baling twine, the opposing poles are "woven" together very, very tightly across the wall. This "weaving" compresses the bales in such a fashion as to create one very solid wall rather than just individual bales stacked on top of each other.
Close up of bale needle.
Wayne demonstrates one of the "weaving" knots.
Knotting bamboo pole in place.
Shanna "weaves" a wall together.
Riley pounds bamboo pins into bales below a window opening.
The completed west wall.

Scott spoke with our window provider yesterday. The first shipment should arrive sometime next week and I'm sure we'll have our straw bale walls done just in time. We only have half a house worth of straw to finish.
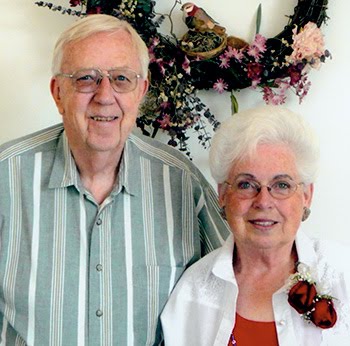
The team.
The team in front of the completed west wall. (Click on the picture to see us celebrate.)

Thursday, June 23, 2011

More Insulation

On Thursday of last week, we had visitors from an another planet. At least that's what they looked like once they had donned their gear.  This is how the visitation came about.

Earlier this year, Scott spent three days installing tons of cellulose insulation in the ceiling of the main part of our house. Now that we were nearly ready to raise the straw bale walls, we needed to get the insulation into the ceiling of the kitchen on the north and the sunroom on south sides of the house. Our architect planned for us to use nine inches of Owens Corning Pink Panther rigid foam. That would have involved many, many hours of cutting sheets to size, gluing them in place and then filling any remaining gaps with expandable foam. That's the yellow foam dispensed from spray cans. If you've had even a little experience with the stuff, you know it's a lot like silly string gone mad. Plus, all of this work would have been the overhead sort that is so "fun" to do.

Since Scott had had such a positive experience with the blown-in cellulose insulation, he thought we might be able to use it in the remaining ceiling spaces as well. Unfortunately, when we presented this idea to our architect, Wayne confirmed Scott's fear that moisture condensation could be a problem. Wayne suggested we look into icynene insulation instead.

We had never heard of icynene, but with a little research and a few phone calls we learned that it is a foam insulation which is sprayed over the area we wish to insulate - our kitchen and sunroom ceilings. Once sprayed it expands and fills in every single void it can in just a few seconds. This creates a very tightly sealed space. Icynene is made from a friendly material, castor bean oil. If we were looking for LEED certification for our house, it could also contribute points for that certification. You can learn more at http://www.icynene.com/green-building.

The deal sealers for us were that using icynene would mean we wouldn't have to cut all of that rigid foam and then do all of that work over our heads. Plus it was less expensive than Pink Panther foam and gave us better insulation value for our money. We were sold and that is why aliens showed up in Torrey last week.

Edwin and Juan arrive.
This is their product.
This is what a room looks like before foam insulation is applied.
Juan encloses this space with plastic.
This room is ready for insulation.
All of their equipment is covered with protective duct tape.
Even their shoes...
Edwin and Juan must each wear a respirator during the application.
Edwin is completely protected in this suit. He has also wrapped his head in plastic wrap to prevent even the smallest molecule of liquid foam from entering his nose, mouth and eyes.
Edwin pushing a ladder in place.
Edwin applying foam to the ceiling.
Edwin applying more foam to the ceiling.
Foam insulation is in place and Juan is cleaning up.
A close-up of the foam insulation.
This entire room is done.
Edwin and Juan give a thumbs up.
Not only can the foam be used for insulation, but it can also make a great party hat!

Saturday, June 18, 2011

Design Elements

Before we began our strawbale endeavor, Scott and I attended a strawbale workshop presented by Bill and Athena Steen at their home in Canelo, Arizona. Over the course of eight days, we learned how to retie bales, built a small bale structure, toured several strawbale homes in the area, got our hands into plaster, asked lots of questions and came away with the feeling that we could really build a house of straw.

During those eight days, all of the participants asked questions, more questions and even more questions. Many of the questions focused on what to do if this problem or that problem arose. Athena, who is a very funny and incredibly creative person, gave quick advice: turn that problem into a design element. At the time, it didn’t feel like she was really addressing the concerns, but now we know what she meant. We have to roll with the punches. That’s because there is something of a serendipitous nature to strawbale construction, and we regularly find ourselves following Athena’s advice to the letter. We turn problems into design elements. A perfect example happened this week.

When the foundation for the house was poured two summers ago, we didn’t fully understand what the plans were telling us. We also didn’t realize how a little cement missing from a threshold would effect the way the door, the walls and the finished earthen floor would come together.

Monday, as Scott and Doug were framing the door for the entryway, we realized what that missing bit of cement would do. Suddenly we needed Athena’s design element solution, so I drove half a block down the road to ask our neighbor, Wade Hansen, if he could help. Wade is an extremely talented stone mason who has done a lot of work in our state. Luckily for us, he was able to come right over. Once Scott explained what we needed, Wade had a solution - place a stone in the floor where there should have been cement. 

A piece of inlaid sandstone will become another beautiful design element and will, in fact,be better than the original plan.

First Things First

Two weeks ago we arrived back in Torrey for the third summer of building. Our initial plan was to have our entire house completed by the end of this year. But, as every book we read cautioned and as every person we talked with told us, building your own home takes far more time and much more money than you think. Still, this is the season our house will really begin to look like a house. You know, with with walls, windows and even doors. I am anxious for our bales of straw to make the short journey from their temporary home in the garage to their permanent location in the walls of our house.

First things first though. We had to frame all of the window and door bucks. These are the wooden frames that provide the rough opening and structure into which our Serious Windows and Thermatru Doors (with Serious Glass) will be installed. Scott and Doug completed those this week! With nail guns in hand, they transformed piles of 2X6s and 4X4s, into the openings for 14 windows and 6 doors. These few words make that task seem rather simple, but aching backs, creaking joints and not just a few sore muscles attest to the effort this took.

You can see some of their handiwork here.


Friday, June 3, 2011

Season Three Begins

In the first week of May, Scott and I headed to Torrey for our first attempt at gearing up for the new building season. The long winter and reluctant spring sent us south with hopes for a few warm days to, among other things, plant more new trees and to oversee the installation of siding to the gables and sides above the porch. We drove in and out of showers and cold wind and arose the first morning to two inches of snow. This was not what we had in mind.


 Despite the frigid start, the days gradually warmed, and Kirk and Butch had our siding on in no time at all. In fact, in this movie, you can see that it only took them one minute and forty-two seconds, or two days in real time. By the time we left, our short chore list, was complete.


Sunday we head back to Torrey. This is the summer our house will begin to look like a house instead of a fancy picnic pavilion. By fall, we’ll have the straw bale walls erected and at least one coat of plaster on the exterior and the interior.

We hope the weather gods are watching over us and are in a benevolent mood.