Saturday, December 17, 2011

The Allure of Indoor Work

As long as I can remember, my dad worked in construction.  His were not small-time projects. They were big deals which included hospitals, high schools, university housing and office towers. I’m guessing he began as a laborer, but he eventually became a well-respected superintendent who always completed his jobs on time and under budget. I think one of the hardest things he had to deal with though was inclement weather. Dad always worried about a winter concrete pour, or cranes operating safely in the cold, or the possibility of ice falling on employees.

Now, whenever I see construction workers, bulky in their multi-layer garb, welding the framework of a three-story office building or moving pre-fab walls into place, and doing all of this in the grasp of winter’s icy hand, I remember watching my dad do the very same thing. I’m sure they, like my dad, are happy when the walls of a project are finally up and the grip of snow and wind clutches air and brick instead of cloth and skin.

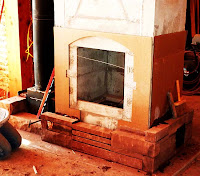
When we asked our neighbor and mason friend, Wade Hansen, if he might be interested in creating the facade for our masonry heater, I completely understood the smile that appeared on his face as he contemplated the possibly of indoor work (complete with heat, light and plumbing) in December. His bid was one we decided we had to afford because Wade’s work is so beautiful. Here are photos of his progress thus far. We are lucky to have such a fine craftsman working with us.


Three Year's Progress

They say a picture is worth a thousand words. You can decide for yourself.

November 2011
November 2010
November 2009

Interior Walls

Now that the weather keeps us indoors, we devote our time to interior work. Some of the projects require two full-time workers - plastering or window trim for example. Other projects require one full-time person (usually Scott) and occasionally a second person (usually me) to hold a piece of wood in place while the other wields the nail gun for a moment or to hold one end of the tape measure while the other reads the smart end. During the off-duty moments, the second person (me) needs to make herself useful, so I’ve been nailing lath to the framing of our interior walls.

Anyone familiar with conventional construction might wonder why in the world we’re using lath. That same person would know that the logical next step to a lath wall is plaster...hence the term “lath and plaster walls.” In today’s construction world, lath and plaster has been mostly replaced with solid drywall which is faster and less expensive to install. But, as we have seen with the change in our construction time line, we apparently are not worried about faster (even though being finished with this house before we’re 60 would be nice). Traditional lath and plaster walls require skilled plasterers to apply three coats of plaster over a framework of lath strips. By the time we are actually finished, we’ll probably be able to hire out as skilled plasters. And, since solid dry wall is, well, solid, it’s not the best material for making curved walls with the handmade look we so admire. Hence the process begins.

During our Thanksgiving stay I was able to put up the lath on one side of the walls separating the main living space of our house from the bedroom and from Scott’s office. We can more easily see the space we will soon be living in.

Looking from the living room into the bedroom
The other side of the same wall
Looking from the bedroom into the living room

Saturday, November 26, 2011

Another Burlap Solution?

This morning in Torrey it is 27 degrees outside. The sun is clawing its way above the Henry Mountains to the southeast and a stiff breeze keeps us indoors. The operative word here is “indoors.” That’s because we really have an indoors to call our own - airtight, quiet, and warm, warm, warm. That’s why Scott and I have been able to work on the house this Thanksgiving weekend.

Our first project was a problem solving experiment, the result of which would determine how we prepare the interior walls for plaster next spring. This involves the eleven windows in our house that are set into the bale walls. The challenge here is to determine some method by which we can create the sensuous curved edges that attract us and so many others to this alternative building material.

Straw bales are, by definition, rectangular. That’s the way a baler makes them. It’s one of the things that makes them easy to stack, which is important when using them to build a wall. But this rectangular shape also means they have square edges, 12 of them to be exact. Each of our eleven windows are surrounded  by eleven bales, and each of those bales presents one sharp edge that must be coerced into that lovely, much desired curve.

Some strawbale resources suggest using a chainsaw to cut the bale edges into a curve (or bullnose). We had already used a chainsaw when notching and shaping bales during the wall-building phase. Each bale bounding a window had one edge somewhat rounded before being stacked. On the experimental window we tried using the chainsaw again to even up the curve, but it was extremely messy and made an already soft bale edge even softer. Not such a good surface to hold plaster.

A sudden ah-ha moment reminded us of our earlier success with burlap as a patching agent. We decided to use burlap again, this time as a material we could tack in place at the window buck, then stretch around the corner of the bale and staple in place with 8-inch long staples we manufactured out of barbless fencing wire. There were places we needed to stuff with straw in order to fill holes, but we did eventually achieve the curve we wanted. The final questions were: would that large expanse of burlap support plaster? Could it maintain its shape?  Would the wall be strong?

Following the same process we used with the exterior plaster, we sprayed the wall with clay slip, then applied a 1-inch, more or less, scratch coat.

We have to wait for the plaster to dry to know for sure, but I think we’ve found our solution.

Saturday, November 12, 2011

Let There Be (Some) Light

Nearly one year ago, in preparation for putting the roof on our house, Scott and I had to make decisions about exterior and interior light fixtures. It seemed like an odd time in the building schedule to be choosing finishing details, but there was a good reason.

You see, in traditional construction, plumbing and wiring run through the stud walls. Not so with our straw bale house. We wanted no penetrations of any kind through our exterior bale walls. This meant that our electrician needed to run the wiring from the inside floor where they arrived by underground conduit up a post and above the ceiling before we could add roof or walls. (See more in post entitled Roof, Rain and a Looming Deadline.) Hence the unusual timing.

I had no idea choosing lights would be such a time-consuming task. The location of each light was plainly marked on the plans.How difficult could it possibly be? I began collecting piles of timber frame design books. Pouring over every photograph I searched for light fixtures that would illuminate our beautiful tongue-and-groove ceiling and, at the same time, shed plenty of light on activities below. Track lighting appeared to be the principal choice, but it looked too industrial for our tastes. Eventually I put the timber frame books aside and just started turning the pages of Susan Susanka’s Not So Big House books. Every time I saw an appealing fixture, I put a post-it note on it. Soon Scott and I narrowed out options then headed to Thomson Premier Lighting and Appliance Center here in Logan. There, Jeff Thomson helped us find exactly what we wanted.

When Scott was in Torrey in October, he and Trent (our electrician) installed lights and fans in the main living area. This will make it much easier to work inside when we head south again next week.

Sunday, October 30, 2011

Loose Ends

Because this is our only real experience working with straw bale walls, I’m only guessing when I say most of those walls meet at corners. Hence, we wouldn’t typically see the ends of any bales in an interior wall. We would usually see them at the exterior corners of the house where those ends could be easily covered with plaster.
Our house, with its “T” shape has four places where the end of a bale wall can be seen inside the house. These also happen to be the places where much of the electrical wiring has been placed as can be seen in this photo.

Looking closely at the bales, there is a great deal of loosely bound straw plus large gaps between the bales. There are also several large indentations created by pressure the baling twine exerts on the bale to hold it together. In addition, there's that plastic-coated wiring to deal with. All of these things could be big problems when it's time to plaster this section of the wall. Next spring we plan to apply two inches of plaster to all of the interior walls. However, some of the gaps and indentations in these problem areas are as large as 8 inches. What to do?

On the exterior of our house, there were several sections where we used wood lath to cover gaps which we stuffed with straw. It was something of an experiment although we had read about it on-line and in our plaster book. When we plastered the lath, everything went well, so we've decided to attempt the same method on the four problem areas inside the house.

One-inch nailer on left
First Scott nailed a one-inch by one-inch nailer in front of the wiring. Our intent was to provide a surface to which we would nail one end of each piece of lath. We also needed to protect the wiring from being punctured by the nails holding the lath in place.

Working from the floor up, I nailed a few pieces of lath in place, then stuffed straw into the gaps.
Here is the entire section covered with lath.


And a close-up. It seems like this is a surface we'll be able to plaster without any trouble. We'll see the result next spring.

Saturday, October 29, 2011

In The Meantime

When the temperature gets below freezing, making plaster becomes a challenge. The earth is too cold, the water freezes and it’s just plain no fun. So, now that the weather is reaching the low twenties at night and only gets into the fifties during the day, we have transitioned from outdoor to indoor work. Not only has this been a wise move, but it puts smiles on our faces to be inside the house where the solar panels are doing a nifty job of keeping the temperature at a lovely 65-plus degrees. Not only does this warm our bodies, but it warms our hearts to know that we aren’t sending our pennies to the utility company. Good old Sol has our back.

Our first indoor project was of the cosmetic nature. Last November when Tyler’s crew built our ceiling with the gorgeous beetle-killed ponderosa pine tongue and groove, it was impossible to cut the ends of each plank in such a way as to create a perfect union at the peak of the ceiling. In fact, this goal wasn’t even on the radar in as much as Scott and I had decided to cover the peak of the ceiling with some, as yet, undecided product. We talked about several possibilities, but we finally decided upon bamboo. You see, we have absolutely fallen in love with that material and are using it wherever we can. The peak of the ceiling was our first opportunity to use it as a decorative accent.

We ordered four-inch, 10-foot long, half-rounds of bamboo from the nice folks at Cali Bamboo. We applied Minwax gel stain to each pole, waited for it to dry and screwed it to the ceiling. The only real challenge was the height which we conquered with a double-decker scaffold.

Gap at peak of ceiling


Gap covered with bamboo half-round
Scott on the scaffold
 Success!

Wednesday, September 7, 2011

First Plaster Coat on the Exterior

This is the appearance of the exterior of our house as of September 7, 2011.
East wall
North wall
South wall
There are still many, many layers of plaster to go, both outside and in. But we love the process. And we feel like our home is literally rising up from the land. Amazing!

Interlude

Sometimes, most times actually, life gets in the way of desire. This is the only thing that can explain our lull in construction-related activity. I had to return to work at my university, and Scott had to attend to Logan business related to his new, soon-to-be-published book. Once the requisite business was taken care of, Scott returned to Torrey where he is now hard at work staining our exterior doors, installing door handles and locks and hanging said doors.

By way of explanation, rather than opting for solid hardwood doors, we purchased fiberglass doors from Therma-tru. You might ask why we would choose fiberglass doors when wood plays a starring role in our entire house. The answer? Our exterior doors are three quarter light doors. I've learned that means that glass is three quarters of the door. We wanted Serious glass in the doors because of the insulative qualities of the glass, and Therma-tru doors are the only doors in which Serious Windows will put their glass.

Therma-tru does not make a wood door, but we wanted the wood look. We also wanted all of the advertised benefits of their fiberglass doors: low maintenance; wood grain look; no rotting, deterioration or rusting; energy efficiency; no warping, bowing or twisting; security and great insulation.

I was a bit apprehensive about our decision when I saw what the unfinished doors looked like at delivery. But all of that worry evaporated when I saw the stained and installed door. Since I'm not in Torrey, I accept Scott's assurances that the doors will be beautiful. His photos give a clearer picture of the actual appearance. I'm also heartened to hear of visitors' incredulous comments: "You're kidding! That's fiberglass? They look like imported antique doors."

How lucky to have a partner who works on your shared dream when you cannot be there with him.

In this video, I think you can see how easy it is to achieve this part of our goals.


First door in place
An inside view
Close-up of door hardware
An important aside...We purchased our door hardware from Beazer Lock and Key in Logan, Utah. They were extremely helpful and knowledgeable.

Monday, August 8, 2011

The Satisfactory Solution End Note

Last Thursday, the satisfactory window solution arrived in the form of Rich Barker (our sales representative) and Dane Knudsen (the window technician Rich has worked with before.) We were a little worried about the timing of their arrival because the previous day's day hike began with blue skies and ended with rain. When we returned to Torrey that day, we learned it had rained over an inch. By the time Rich and Dane pulled up to our house, dark clouds were already building in the west.

We hoisted the first window onto sawhorses.
Nonetheless and without delay, we faced the first big hurdle, moving those big windows into position so that everything could be done at a comfortable height rather than on the ground.


Shortly after work began, the rain began to fall. Luckily, Rich and Dane were able to do some of the work under the porch.


Perhaps they imagined it would be a hot day of working in the sun, but the rain, and eventually hail, had other plans. Rich and Dane soldiered on despite the inclement weather.


The first window was completed without incident.


The second window was installed without incident.


Scott, Dane, Rich Mary, Shanna and Doug
The entire team is reflected in a window after the project is completed. Without the efforts of Rich Barker on our behalf, nobody would be smiling. He is a terrific representative for Serious Windows.

Thursday, August 4, 2011

Adobe Bricks

The interior wall that abuts our Tempcast masonry heater will be built with adobe bricks which will then be plastered. The logic behind this design is that the masonry heater will heat our house and, at the same time, the adobe wall. The heat from the wall will radiate into the room on the opposite side of the wall, Scott's office.

Monday we had a family work party. The goal? To make 150 adobe bricks, 5 1/2 inches wide by 3 1/2 inches tall by 14 inches long. While Doug and Shanna manned the mortar mixer, the rest of the family went into production mode.

Wesley rinses brick forms.
Barb, Wesley and Kelli fill forms with plaster.
Kelli smooths plaster.
John uses a double form.
Wesley uses a stick screed to remove excess plaster from form.
Jessica fills buckets with clay for the mixer.
Casey keeps Missy company.
Adobe bricks lined up inside the house.
In less than half a day, we made one hundred and fifty-one bricks. Eventually they will go into our heater wall.

First Layer - Part 2

We are definitely plaster novices. That fact became very apparent when Doug stood his straight edge up against our walls. As you can see in this picture, there were gaps, some wide and others small, from the eaves to the drip edge at the bottom of each wall. This was due to the irregularity of our bales. In some places, they bulged out. In other places they swooped in.

To make the application of our last two plaster layers easier, our plaster team - Scott, Doug, Shanna, Linda and I - made a second pass around the house with our trowels, straight edges and plaster bins. That means there is lots of plaster, almost three inches in places, while some spots have a very thin layer.

Part of the charm of a strawbale house is the organic curve of the walls. We wanted to preserve that feeling, but we also didn't want the walls to look like a lumpy chocolate layer cake either. Without being overly fixated on straightness, we now have a much more even plane upon which to place our second plaster layer. For most of the house, this will consist of clay, straw, water and sand. On the north bump-out, this will consist of clay, straw, sand, lime putty and water. Scott will begin the second layer in late August.