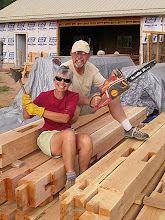
This morning in Torrey it is 27 degrees outside. The sun is clawing its way above the Henry Mountains to the southeast and a stiff breeze keeps us indoors. The operative word here is “indoors.” That’s because we really have an indoors to call our own - airtight, quiet, and warm, warm, warm. That’s why Scott and I have been able to work on the house this Thanksgiving weekend.
Our first project was a problem solving experiment, the result of which would determine how we prepare the interior walls for plaster next spring. This involves the eleven windows in our house that are set into the bale walls. The challenge here is to determine some method by which we can create the sensuous curved edges that attract us and so many others to this alternative building material.
Straw bales are, by definition, rectangular. That’s the way a baler makes them. It’s one of the things that makes them easy to stack, which is important when using them to build a wall. But this rectangular shape also means they have square edges, 12 of them to be exact. Each of our eleven windows are surrounded by eleven bales, and each of those bales presents one sharp edge that must be coerced into that lovely, much desired curve.
Some strawbale resources suggest using a chainsaw to cut the bale edges into a curve (or bullnose). We had already used a chainsaw when notching and shaping bales during the wall-building phase. Each bale bounding a window had one edge somewhat rounded before being stacked. On the experimental window we tried using the chainsaw again to even up the curve, but it was extremely messy and made an already soft bale edge even softer. Not such a good surface to hold plaster.

A sudden ah-ha moment reminded us of our earlier success with burlap as a patching agent. We decided to use burlap again, this time as a material we could tack in place at the window buck, then stretch around the corner of the bale and staple in place with 8-inch long staples we manufactured out of barbless fencing wire. There were places we needed to stuff with straw in order to fill holes, but we did eventually achieve the curve we wanted. The final questions were: would that large expanse of burlap support plaster? Could it maintain its shape? Would the wall be strong?

Following the same process we used with the exterior plaster, we sprayed the wall with clay slip, then applied a 1-inch, more or less, scratch coat.
We have to wait for the plaster to dry to know for sure, but I think we’ve found our solution.


 Following the same process we used with the exterior plaster, we sprayed the wall with clay slip, then applied a 1-inch, more or less, scratch coat.


")


No comments:
Post a Comment