Tuesday, August 6, 2013

Accounting for Fun

Since I must return to work in Logan soon, our summer building season is quickly drawing to a close. Reviewing the "to do" list last week provided great satisfaction because we were able to cross off most of our projects.

The Pretty Big Things:
* grout and seal the bedroom floor
* finish  Scott's office: metal on counters and put trim on walls
* add the facade to the entryway pony wall and install doorknob coat hangers
* hang exterior lights and cover outlets
* build wheelchair ramp
* clean and re-wax the veranda posts

 And the Really Big Ones
* sand, stain and place the window seat
* apply last plaster coat and aliz to exterior
* paint exterior bump outs
* lay veranda pavers
* THE KITCHEN: oven, counter, sink and cooktop (We're in the middle of putting down the cork floor right now.)

Whew!

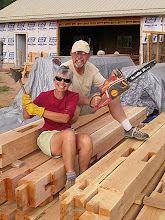
Mom, Scott and Jessica standing beside clean posts

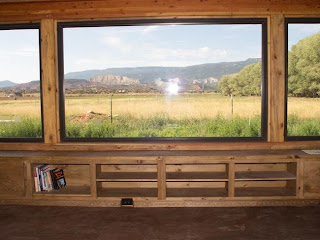
The finished window seat

An almost completed kitchen

The bathroom fully ready for use

An inviting veranda

Riley, Scott and I had time for a trip to Blind Lake, a popular destination on Boulder Mountain.


Still, Scott and Riley couldn't resist a bit more construction.

But, despite a brief few hours spent searching for two of our llamas who got off their stake out lines, we had plenty of time for skipping stones.

Sunday, August 4, 2013

An Eight-Foot Veranda

Utah code requires a 3-foot by 3-foot solid landing outside each door. Compacted dirt will not meet this code requirement. It also doesn’t meet our code either. The amount of dirt that has been tracked in and then swept out of this house is phenomenal, so getting that solid landing has been the ultimate goal from the get go. By the time the inspector put this requirement on the list, we had already ordered the pavers for the entire veranda. At that point, we were just waiting for delivery of pavers and for Riley’s arrival.

In early July, the folks from Loa Builders delivered 1800 pavers on nine pallets which they strategically placed around the house.


At the same time, they used their fork lift to move Mort the Mixer from the middle of the driveway to a resting spot while he awaits repairs.


While we finished laying tile in the kitchen, Riley enjoy a few hours of removing straw and more resistant material from veranda.


Then Mary and Riley used a screed board to level the base of the veranda.
  

Then Scott used a roller filled with water and sand to compact the dirt.
 

Riley watered the dirt in order to compress it even more.


Next the boys laid black pavers around the perimeter of the veranda. This served two purposes: to hide the unsightly cement work that bounded the veranda and  to raise the entire veranda 2 1/4 inches. This would help keep rain water away from the earthen walls.


It does rain in Torrey. This summer the monsoon arrived on Big Apple Day. It has rained, off and on, almost everyday since.


We needed to decide on a pattern. The choices we considered were running bond and herringbone. We chose herringbone.


Since one never knows what the future holds, we decided to build a wheelchair ramp on the west side of the house. Now we'll always be able to enter the house easily, and, if we should ever get a piano, it will be a cinch to get it inside.

Following the initial screed activity, we had to screed the area one more time, this time adding sand to fill the space. We would set the pavers in this sand.


Riley and I got right to work setting the pavers in place.


As you can see from this movie, we were serious about getting the job done quickly.


Riley swept sand into the spaces between the pavers.


At the same time, Scott cut and placed pavers in the spaces against the house where whole pavers didn't fit.


At last we were done. I'm sure we'll be spending several moments every day sitting here.


The Window Seat

The best thing about our house is the view out the windows of the south bump out. From the beginning, we planned for a seat under those windows so we could spend many hours looking at our world in comfort. To that end, Mel Olsen, our cabinet maker in Cache Valley, built a beautiful pine window seat in four sections. We brought those sections to Torrey at the same time we brought Riley from Salt Lake. And he became the key to our ability to finish the list we had received from the inspector in June.

The south bump out is the one exterior wall that is not made of straw. We thought installing such huge windows on top of just two rows of bales was not worth the challenges. Instead of straw, this is a stud wall filled with Icynene, the castor oil-based, foam insulation we also used in the bump out ceiling. This stud wall makes the installation of our window seat very easy, especially when compared to other projects.

 Riley and I sanded and stained the window seat sections.


Once the sections were in place in the south bump out, Riley screwed them securely to the stud wall.


I put the shelves in place, awaiting the day when they would be filled with books.


The finished window seat is a great spot to play the guitar, contemplate the day, or


just enjoy watching the world.

Kitchen of Our Dreams

I don’t really dream. At least if I do, I don’t remember them. So, when I recalled having bad dream after bad dream about tiling the kitchen counter, I thought it might be a message. That message was that this tiling endeavor would end in a huge and messy train wreck involving twisted Schluter profiles and back splash tiles falling off the wall into an overflowing sink. This was a project I was absolutely not looking forward to.

Despite bad dreams, we dove in head first in an attempt to have a working kitchen before our nephew Riley arrived from Seattle for a two-week visit.

Here is the kitchen prior to any counter work. As you can see, Rusty the cat is very interested to know what will happen next.

The cabinets against the strawbale wall.

Note the uneven surface of the wall and the rounded shoulder of the strawbale window ledge.


Scott brings in the first section of Kerdi Board. This "board" is hard foam board used in place of the two layers of exterior grade plywood and one layer of cement backer board we would have needed to install the tiled-under sink. Kerdi Board is fairly pricey, but we computed the cost of the plywood and backer board. Considering this and the amount of time saved using the Kerdi Board, we opted for the board.


Test fitting the sink

It fits.

The sink is proud of the Kerdi Board surface. To tile over the flange, the sink needs to be flush with the Kerdi Board.

Scott used a router to removed just enough Kerdi Board to allow for the sink to sit correctly.

It fits perfectly.

When we first made the window ledge, we did not know we were going to put tile here. We made a very nicely curved edge.

Tile requires square edges and 90 degree corners. To remedy the situation, we need to square up the edge so there is no gap between the tiled ledge and the wall. The first step is to rough up (Yikes!) our once beautiful wall.

Never fear. Soon we'll have a 90 degree corner, a vertical wall and a level window ledge.

More plaster.

More plaster.

Removing the plaster guide.

Scott filled in the gaps between the wall and the ledge.

Fine tuning...

Stentor, our cat, leaves his stamp of approval.

While the plaster dries, we finish installing the Kerdi Board on the remainder of the cabinets.

We test-fit the cook top.

I can see supper cooked in our completed kitchen in the near future.

We needed to decide between two patterns: a running bond (like bricks on a house) or all of the tiles lined up. After surveying our family and friends, we decided upon lining up the tiles.


The Kerdi Board didn't seem strong enough to support the overhang of the counter, so Scott made three braces from the wood left over from our timber framing days.


I'm glad we bought a band saw at a local garage sale.

We added thin set to make the surface of the window ledge level.


This membrane called Kerdi Band will provide a water-proof barrier between the kitchen counter and the strawbale wall.

Here Scott puts the first of the edge profile on the small counter just inside the door to the kitchen.

Next comes the field tiles.

Then the tile in the edge profile.
This is the practice layout before we used thin set to hold the tiles in place.

Now for the real thing...

Working on top of the counters...
Scott cut a beautiful curve.
Beginning the backsplash...


We're getting there.
Pete comes to inspect.
He thinks the color of the tile matches his eyes.
"A little to the left."
Scott continues laying out the field tiles...
while I finish the tiny pieces of backsplash under the window ledge.
Stentor feels very comfortable on this counter. This is where a cat belongs.

Nikki comes to help and to bring us good cheer.
Only a few steps to go.
Preparing to grout
Grouting the back splash
Phillip and McKay finish installing the cook top and sink faucet.
Scott prepares the first meal in our completed kitchen. Stir fry. Delicious!