Before this first bale could be set in place, we attached burlap to all of the exterior timber frame surfaces that will have plaster against them. We did this because plaster and wood don't really like each other very much. They'll sit together quite nicely for awhile, but, as time passes, the plaster dries and contracts a bit leaving small gaps between itself and the wood. These gaps could eventually become conduits for moisture to enter the bales, and this is a big problem in the straw bale world. We love new experiences, but this is one we would like to skip. The burlap will act as a relationship reinforcer. When we get to the plaster stage (which isn't far away - hooray!), that burlap will be pressed into the first layer of plaster which will give strength to the bond, thus reducing the chance of future separation.
Next we pounded 12-penny nails part way into the sill plate at four-inch intervals. The nails stand about two inches above the sill plate in a zig-zag pattern. As the bales of straw are set in place, the heads of the nails dig into the bottom of the bales and provide a very strong hold. This prevents the bales from moving off of their foundation.
It's surprising to see how quickly the straw bale phase of the building goes. In just four days, a handful of people have completed almost half of the wall installation. Most of the work in done in pairs which change as needs change. Shanna, Doug, Scott and Riley have done most of the straw bale work. This involves stacking bales, retying them to fit the space, notching bales to fit around posts, tying bales to the timber frame with eye screws, and shaping bales to provide curved surfaces at the window and door openings.
Scott and Doug place eye screws into timber frame posts.
Scott tamps the first bale securely onto nails in the sill plate (or toe up).
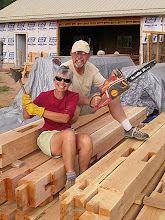
Scott shapes a bale with our precision chain saw.
Riley tamps a bale into place.
Doug takes a moment to evaluate.
As a section of wall is completed, bamboo poles are attached to the wall at the base of the sill plate and at the ceiling. We used conduit straps at the bottom and drilled holes in the ceiling at the top. The poles are placed directly opposite each other on the inside and on the outside of the wall. Using a bale needle and baling twine, the opposing poles are "woven" together very, very tightly across the wall. This "weaving" compresses the bales in such a fashion as to create one very solid wall rather than just individual bales stacked on top of each other.
 |
| Close up of bale needle. |
 |
| Wayne demonstrates one of the "weaving" knots. |
 |
| Knotting bamboo pole in place. |
 |
| Shanna "weaves" a wall together. |
 |
| Riley pounds bamboo pins into bales below a window opening. |
 |
| The completed west wall. |
Scott spoke with our window provider yesterday. The first shipment should arrive sometime next week and I'm sure we'll have our straw bale walls done just in time. We only have half a house worth of straw to finish.
 |
| The team. |
 |
| The team in front of the completed west wall. (Click on the picture to see us celebrate.) |


Awesome, things are progressing nicely. Can't wait to see the plastered walls too.
ReplyDeleteJudy
Very nice! Thanks for sharing with the rest of the the world.
ReplyDelete