Monday, August 6, 2012

An Earthen Floor

We have been anticipating the completion of our earthen floor. The dirt and dust has become more and more tiresome, especially in the last few weeks as we see this structure evolve into a house.

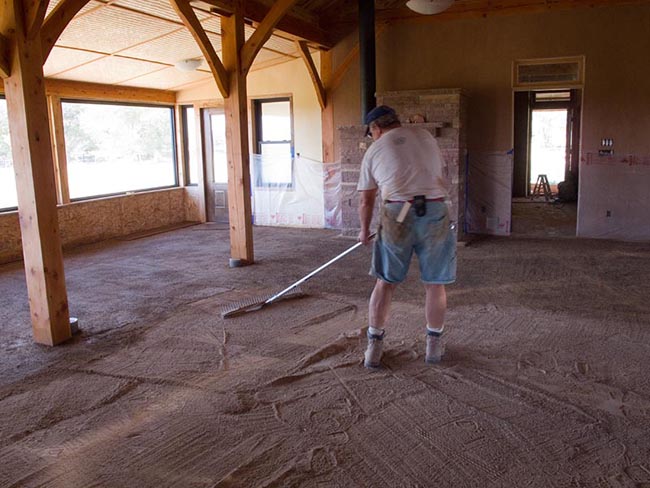
Early on our architect explained that the earthen floor would be the very last phase of our project. Why last? Because it takes several weeks to complete the entire process. During that time, and even after it is done, we cannot easily put scaffolds on the floor since they will damage the finish. Still, that dirt is awfully, well, dirty, and like an unwelcome visitor, we are anxious to see it go. Even though the end of construction is at least a year away, we decided the earthen floor could be the last phase of our main living space. A year was too long to wait for dirt to be gone.

To that end, after a big push to finish all of the lath and straw walls in the main living space, we made all of the preparations  necessary  in order to cover our dirt.  We planned to be set up and well organized before our team showed up Monday morning at 9:00. This meant plenty of sifting clay, chopping straw, and mixing, mixing, mixing plaster - 47 loads of it the day before installation. Doug made enough screed boards for everyone to have their own. These boards, the thickness of the finished floor, were designed to be used as guides as the plaster was applied to the floor’s base.

I think Scott had been dreaming about all of the things that could go wrong with this floor since we first decided to put one in our house. I know, the night before floor plaster day, I dreamed of a 45% degree floor covered with boulders which I attempted to plaster all night long. So much for a restful night.

Monday morning John, Linda, Shanna, Doug, Jerry, Cali and I gathered on the dirt for instructions. Scott explained the process and demonstrated the use of the screeds, all the while emphasizing the importance of applying enough pressure to compress the plaster and, at the same time, remove all air gaps. This would help prevent cracking in the floor.

Everyone set to work at the south window, forty-seven loads of plaster arrayed behind them. Shanna and I manned the mortar mixer and refilled empty tubs as quickly as they appeared. Seven and a half hours later, with a total of 69 loads of plaster smoothed before us, we toasted a successful floor installation and cheered the end of dirt.

Scott levels the floor before plaster is applied.
The rented mortar mixer that did the heavy lifting for two days.

Tubs of plaster awaiting application.
The team begins plastering the floor.
Halfway finished.

 Scott hard trowels the floor after it begins to dry.
The first step of the floor is now finished. Over the next several weeks we will apply a plaster paint then many coats of linseed oil to complete the process.

Where to Start

Now that we have two employees to help us, we needed to decide where to start. We wanted to have the main living space (kitchen, dining room and south bumpout) done first. If this were to happen right away, we could have our cabinet maker take measurements, work his magic with wood and install the entire shebang before winter. This is exactly what we did.

We are fortunate to have Doug and Shanna back with us for a third summer. This time they are here from Greece. With everyone working together, maybe we really will be able to cover up all of the straw and dirt.

Two weeks ago, Scott, Shanna and I began mixing load, after load, after load of plaster in the mortar mixer. Doug installed the necessary plaster stops and Cali and Jerry plastered away. The main living space is done except for the earthen floor which will be done last.
Cali Plastering
Jerry Plastering
Cali and Jerry in front of the front of first completed plaster wall
Scott, Shanna, Nancy, Lucas and Riley painting the kitchen wall
Our pale yellow ochre kitchen wall
Scott began experimenting with pigments for earthen plaster. Keeping with the natural theme of our entire house, we left the largest walls the color of the earth from which it was made. We chose yellow ochre for the kitchen.

Next we will install the earthen floor.

Employees

It’s funny that, in all of the straw bale books and during all of our conversations about building with bales, there was never any mention of how tired one would get of straw and dirt. Brush up against a bale, and you release a shower of straw. Walk across the base of an earthen floor, and clouds of dust mushroom up with each step. On the other hand,  I didn’t think we would be in a fourth year of construction. (Yes, this is taking more time than my original 3-year estimate. At this point Scott reminds me that he always knew it would take longer to finish than my initial 3-year plan and perhaps even forever.)

Still, this season is the one where we are determined to cover all of the straw with plaster and put down our earthen floor. In order to do that we have hired two employees. And they have experience! Lots of it!

Community Rebuilds is an organization in Moab, Utah whose mission “is to build energy-efficient housing, provide education on sustainability and improve the housing conditions of the workforce through an affordable program.” That efficient housing is made possible through the volunteer efforts of interns who come to Moab from across the country. While gaining skills in bale building and natural materials, the labor of the interns reduces the cost of construction thus enabling the building of affordable, straw bale homes for qualified families.

Scott contacted Emily Niehaus (the executive director) asking if she could recommend any of her former interns to help us complete our project. And here they are...our two very welcome employees, Cali and Jerry. With their help, all of that dust and straw will quickly disappear.


Cabinet Nailers

In conventional construction, there are plenty of ways to attach cabinetry and other necessary fixtures to walls. Those ways are called two-by-fours which are used to build the frame of the house. In our straw bale house, there are no two-by-fours. So how do you connect cabinets to walls when the only material available is straw covered with plaster? The answer is “nailers.”

Before plastering the kitchen wall, Scott inserted nailers along the south wall at the height required by our cabinet maker.

Scott began by using the chain saw to cut notches in the bale wall at the specified height.

He then made large (8-inch by 5-inch) triangular spikes out of plywood and screwed short lengths of two-by-fours to each spike. This is the “nailer" which Scott forced into its chain saw notch.

In order to secure each nailer in place, Scott screwed it into the nearest bamboo pole.

Before plastering over the nailers, we made a photo record of their location and height. We now have a very sturdy support system for our soon-to-be-completed (fingers crossed) cabinets.

Sunday, July 1, 2012

Design Feature Number Two

When deciding how to design the kitchen counters and entryway, we realized the entryway window had been positioned two feet too far to the west. Because the cement floor for the kitchen had already been poured two years earlier, it was impossible to move the kitchen cabinets because the cement would show. This misplacement also meant the counter back would impinge on the window. Our question was how could we turn this porblem into a "Oh, that's a cool design" instead of an "Oops! that sure was a mistake."

As we looked for a material to use as a facade for the side of the cabinets that would show in the living room and entryway, we found the answer to our problem.

Here you can see that the cement kitchen floor (eventually to be covered with cork) lines up directly with the frame of the window. The kitchen cabinets line up with the cement floor and, thus, the window. If the window were two feet to the right, the cabinets would have met with the wall with plenty of space to spare for the window.
We built a pony wall to contain the kitchen peninsula wiring and to frame the back side of the counter.

Eventually we will cover and trim the entryway side of this wall and living room side of the kitchen counter with corregated roofing metal that has an aged metallic finish. This metal is actually painted instead of rusted and can be purchased from paintedrustedroofing.com. Antique porcelain doorknobs will serve as coat hangers.

Our hope is that these things, along with a cushion on the stone windowseat will make this a comfortable place to welcome visitors.

Friday, June 29, 2012

Lime and Lime Again

I asked Scott why we decided to use lime plaster on the walls inside of the south bumpout since we were using earthen plaster everywhere else in the house. He said, “Because we want to practice for the exterior lime plaster and because we want to put it in the most conspicuous place possible. Ha. Ha. Ha.”

Doug said this would give us the proper motivation to do it well.

And, as I wrote this post, Scott said, “We did it VERY well.”

Yes, there was a spot of plaster failure (easily corrected), but we were successful in practicing the lime plaster application technique as well as beginning to learn how to apply lime wash to color it.

First we mixed up a load of lime plaster. It consists of Type S lime, pumice, sand, soda ash, kaolin clay, water and poly fibers.
You can see the poly fibers. They are meant to hold the plaster together. In earthen plaster, straw plays this role.
West side of the south bumpout: we planned to plaster the lath and straw portion on the right side of this wall and the OSB (oriented strand board) above the door and below the right-hand window. Because the surface is so smooth, plaster won't stick to OSB easily. To help with this challenge, we stapled expanded metal lath to the OSB.

First Scott sprays water on the surfaces to be plastered. The tape and plastic are meant to keep the lime plaster off of the wood. Otherwise, the lime will change the color of the wood.
Scott begins the first coat of plaster on the wall.
Scott begins the second coat of plaster on the wall.
Scott finishes the second coat of plaster. The texture in the first coat is the scratch pattern that we added to the first layer. This provides the tooth (something for the plaster to grab on to) for the second layer.
The finished lime plaster looks just like sidewalk cement.
Now we will add color to the wall with a lime wash. I begin by measuring a given quantity of Type S Lime. (Note the dust mask and rubber gloves. Lime is not a benign material.)
After several experiments on our practice board, we chose yellow ochre.
It doesn't take much pigment to make a lot of color.
We mixed the wash to the consistency of skim milk. This was very important. On our practice wall, even though the directions clearly stated "consistency of skim milk," it didn't seem like "paint." We made the wash thicker. When it dried, there were hundreds of little cracks and it flaked off. This is called "crazing." When we followed the directions, it worked perfectly. Imagine that!
Before applying the wash, Scott used a sponge to remove loose sand grains from the surface.
Lime wash is semi-transparent when applied.
The wash becomes opaque as it dries. You can see the beginning of this in the upper left-hand corner of the picture.
We decided the color needed to be more robust so we add six more coats of wash. The lower right-hand corner took the longest time to dry. We still don't know why.
After six coats, the color was beautiful but it seemed a little too uniform and flat. We hoped to give the wall a little depth by sponging on one more layer of yellow ochre containing a little more pigment.
We didn't like the result.
So Scott added two more thin coats, one applied horizontally and the applied vertically. Now we love it! The only thing we need to do to complete the walls in the south bumpout is put on the last bit of window trim.



Tuesday, June 26, 2012

It A Matter of Lime

Water and straw do not go well together...at least not when that water is precipitation and the straw is your wall. Therefore, it is extremely important to design a straw bale house with features that keep rain and snow away from the straw walls.

Our house, with its eight-foot porch, demonstrates one way to do this. However, on two sections of the house, the north kitchen bumpout and the south sunroom bumpout, there is no porch. There is only an eighteen-inch eave overhang. This is perfect for passive solar design but not so good for shedding weather.

In order to protect these two vulnerable walls, we will use lime plaster rather than the earthen plaster used under the porch. Earthen plaster will erode when precipitation hits it. In contrast, lime plaster chemically sets up in such a way that the plaster becomes hard enough to shed water without eroding.

We actually have two such scenarios to deal with. On the south sunroom bumpout, where we have three, nine-foot by five-foot windows, we decided against using any straw at all. You might ask why. Of course, straw bales have excellent insulative value, but, as mentioned above, you must protect the bales from moisture. There is only room for one bale of straw beneath these huge windows. To us, it seemed that one bale would provide minimal insulation and, as an extra bonus, would present all of the challenges of moisture exposure. So, no bales there.

Instead, we framed this section with 2X6s and our timber frame. We covered the exterior and interior with oriented strand board (OSB) then insulated the air space between the OSB walls and the ceiling with icynene foam (see June 23, 2011 - More Insulation post). We stapled expanded metal lath to the OSB to provide a tooth for the plaster. Now we have great insulation, no moisture issues and an opportunity to use lime plaster on the inside and the outside of the south sunroom bumpout.

Scott made our exterior plaster with Type S lime purchased in bags from our local building supplier, Loa Builders. He added water, sand, polypropylene fibers, pumice (purchased  from Hess Pumice in Malad, Idaho), kaolin clay and soda ash.

There are two main challenges to using lime. One, it is extremely caustic so we needed to wear  rubber gloves, dust masks and eye protection. Two, lime plaster does not like wind or direct sun, so we needed to wait for a calm day. When two such days were in the forecast we set to work. The 18-inch eave overhang was enough to shadow the wall for nearly the entire day, so the wall was shaded as we worked. Once we finished the first lime plaster coat, we protected the lime from sun and wind by leaning boards against the lower part of the wall. The upper part was shaded by the eaves. For the next two days, Scott misted the lime periodically to prevent it from drying out too quickly. The result was perfect...no cracks and the first of two lime coats finished!


Scott applying plaster under the eaves


A section of wall with the first lime coat


Pete helping


The entire wall with the first lime coat finished