Monday, October 22, 2012

Doug's Shower

Building a straw bale house, no matter the size, is most easily accomplished as a joint venture. We have been lucky in this regard. In the form of finance, consultation, problem-solving, sweat, blood, laughter and encouragement, our parents, family, architect, neighbors and friends have all lent their support.

When it comes right down to it, our house is more theirs than ours. This could not be more true than when it comes to Shanna and Doug, Scott’s sister and her husband. For the third building season in a row, they have left their boat in Europe and spent the entire summer with us at “construction boot camp” in Torrey.

Beyond the work, one of the greatest challenges has always been getting clean everyday. At the end of the first bui lding season, we celebrated when we finally had a toilet and a sink in the garage. That meant we no longer had to drive one mile to the nearest restroom. But the next summer, when we were covered with straw and mud, nobody was smiling when we found ourselves bathing in cold water in that tiny sink.

We resorted to a camping sun shower, which worked perfectly...when the sun was shining. However, contrary to what most folks might guess, Torrey has a monsoon season, and, for Doug and Shanna’s first two summers with us, there were more rainy days than sunny ones. After his last tepid shower last season, Doug declared that he wouldn’t return until we had a real shower with reliable and unlimited hot water.

While Scott and I did our best to get that shower for Doug, the best we could come up with was a shower base, shower fixtures and a shower tent. And, even though the ambiance left something to be desired, at the beginning of this summer’s building season, we had what we hoped Doug would accept as a real shower.

From June to August, this proved to be satisfactory, but, with only two weeks to go until Shanna and Doug were to return to Europe, we dismantled the makeshift arrangement and went to work on the shower tile. We made several trips to Home Depot in Richfield, purchased all of necessary supplies, and Doug and Shanna went to work. All the while, Doug declared that he was no tile expert, but a beautiful shower was completed the day they left Torrey. And last Wednesday, when Mike and Blair from Jones Paint and Glass in Cedar City installed the glass for the shower, they signed our house register with, “It is always a pleasure to install a shower on a perfect tile job.”

This is yet another part of our house that belongs to Doug and Shanna.


An Homage To Trees

In the four years Scott and I have been building this house, we have also been planting trees: fifteen cottonwoods, five blue spruces, five apple trees, two cherries, one plum, four lindens, two peaches, two apricots, five walnuts and two willows, We have plans for others - red buds, green ash, big-tooth maples, mountain ash -  but we need to finish the exterior plaster and grade the ground around the house before anything more can be planted.

Much of this “reforestation” could be called mitigation for the douglas fir and ponderosa pine that were once standing in neighboring forests. And, even though those trees had already been killed by insects and fire before they found themselves resurrected as the posts and beams supporting our house, it seemed appropriate to recognize the origins of our home’s framework.

This is a beauty of straw bale. Any metaphor one might wish to create, can be written in the details of the finish plaster. Thus, we are surrounded by trees outside and in, an homage to trees...

Entryway Tree
Bedroom Tree
Office Door Tree
Office Bathroom Tree

Sunday, September 16, 2012

Ceiling Choices

Like moths to a flame, Scott and I are also drawn to light.  As a result, we decided early on to make the interior of our house as light as possible. In order to achieve this goal, we needed to consider not only the light fixtures, but the reflective nature of the ceiling surfaces as well. The kitchen and the sun room have been of particular concern because we undoubtedly will spend a great deal of time in these two rooms.

For the kitchen, we selected light fixtures that would illuminate the work areas; add depth, dimension and interest to the environment; and, at the same time, provide gentle light to fill the room. We chose light fixtures for the sun room that would allow us the option of filling the room with light when we were entertaining or directing just enough light onto the pages of our latest good read.

We also wanted the ceilings to reflect as much natural light into the rooms as possible. The architectural plywood we used to cover the insulation was extremely reflective, but we never planned for it to be a final surface since it didn’t have the “look” that fit with the natural character of the house. After several false starts we decided to return to a material we have fallen in love with - bamboo. A thorough internet search led us to Creasian Bamboo where we found a product that was beautiful, reflective, and reminiscent of the straw underpinnings of our entire house.

Using a staple gun, we attached the bamboo panels to the plywood ceiling and then fabricated the battens which prevented the panels from sagging and, at the same time, covered the seams. Here is the finished ceiling in the the sun room.


Had we known we would eventually be using these bamboo panels as the ceiling surface, we most certainly would have tried to place the light fixtures in such a way as to avoid the intersection of battens and  lights. This would have saved us the many hours of time spent on detail work, but that’s the way it goes when you are making things up as you go.

Here I am tracing the arc of one edge of a light fixture.

Using a grinder to shape the edge of a batten to match the curve of a fixture.


The kitchen ceiling with several battens in place.


In the end, I believe we achieved our goal of creating spaces with good light that incorporate reflective ceiling surfaces. It looks good too.

Monday, August 6, 2012

An Earthen Floor

We have been anticipating the completion of our earthen floor. The dirt and dust has become more and more tiresome, especially in the last few weeks as we see this structure evolve into a house.

Early on our architect explained that the earthen floor would be the very last phase of our project. Why last? Because it takes several weeks to complete the entire process. During that time, and even after it is done, we cannot easily put scaffolds on the floor since they will damage the finish. Still, that dirt is awfully, well, dirty, and like an unwelcome visitor, we are anxious to see it go. Even though the end of construction is at least a year away, we decided the earthen floor could be the last phase of our main living space. A year was too long to wait for dirt to be gone.

To that end, after a big push to finish all of the lath and straw walls in the main living space, we made all of the preparations  necessary  in order to cover our dirt.  We planned to be set up and well organized before our team showed up Monday morning at 9:00. This meant plenty of sifting clay, chopping straw, and mixing, mixing, mixing plaster - 47 loads of it the day before installation. Doug made enough screed boards for everyone to have their own. These boards, the thickness of the finished floor, were designed to be used as guides as the plaster was applied to the floor’s base.

I think Scott had been dreaming about all of the things that could go wrong with this floor since we first decided to put one in our house. I know, the night before floor plaster day, I dreamed of a 45% degree floor covered with boulders which I attempted to plaster all night long. So much for a restful night.

Monday morning John, Linda, Shanna, Doug, Jerry, Cali and I gathered on the dirt for instructions. Scott explained the process and demonstrated the use of the screeds, all the while emphasizing the importance of applying enough pressure to compress the plaster and, at the same time, remove all air gaps. This would help prevent cracking in the floor.

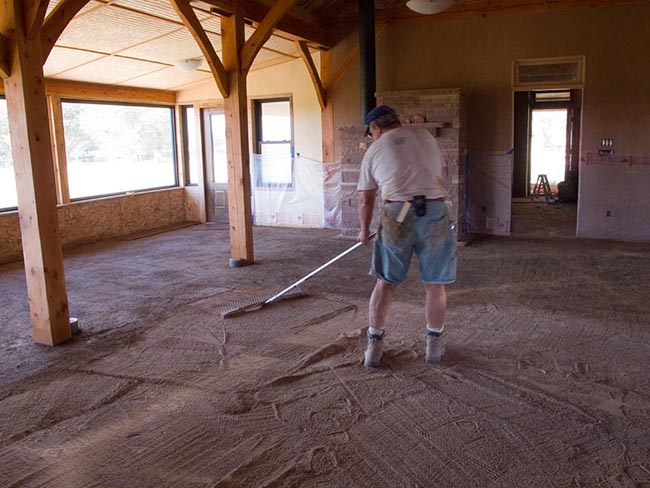
Everyone set to work at the south window, forty-seven loads of plaster arrayed behind them. Shanna and I manned the mortar mixer and refilled empty tubs as quickly as they appeared. Seven and a half hours later, with a total of 69 loads of plaster smoothed before us, we toasted a successful floor installation and cheered the end of dirt.

Scott levels the floor before plaster is applied.
The rented mortar mixer that did the heavy lifting for two days.

Tubs of plaster awaiting application.
The team begins plastering the floor.
Halfway finished.

 Scott hard trowels the floor after it begins to dry.
The first step of the floor is now finished. Over the next several weeks we will apply a plaster paint then many coats of linseed oil to complete the process.

Where to Start

Now that we have two employees to help us, we needed to decide where to start. We wanted to have the main living space (kitchen, dining room and south bumpout) done first. If this were to happen right away, we could have our cabinet maker take measurements, work his magic with wood and install the entire shebang before winter. This is exactly what we did.

We are fortunate to have Doug and Shanna back with us for a third summer. This time they are here from Greece. With everyone working together, maybe we really will be able to cover up all of the straw and dirt.

Two weeks ago, Scott, Shanna and I began mixing load, after load, after load of plaster in the mortar mixer. Doug installed the necessary plaster stops and Cali and Jerry plastered away. The main living space is done except for the earthen floor which will be done last.
Cali Plastering
Jerry Plastering
Cali and Jerry in front of the front of first completed plaster wall
Scott, Shanna, Nancy, Lucas and Riley painting the kitchen wall
Our pale yellow ochre kitchen wall
Scott began experimenting with pigments for earthen plaster. Keeping with the natural theme of our entire house, we left the largest walls the color of the earth from which it was made. We chose yellow ochre for the kitchen.

Next we will install the earthen floor.

Employees

It’s funny that, in all of the straw bale books and during all of our conversations about building with bales, there was never any mention of how tired one would get of straw and dirt. Brush up against a bale, and you release a shower of straw. Walk across the base of an earthen floor, and clouds of dust mushroom up with each step. On the other hand,  I didn’t think we would be in a fourth year of construction. (Yes, this is taking more time than my original 3-year estimate. At this point Scott reminds me that he always knew it would take longer to finish than my initial 3-year plan and perhaps even forever.)

Still, this season is the one where we are determined to cover all of the straw with plaster and put down our earthen floor. In order to do that we have hired two employees. And they have experience! Lots of it!

Community Rebuilds is an organization in Moab, Utah whose mission “is to build energy-efficient housing, provide education on sustainability and improve the housing conditions of the workforce through an affordable program.” That efficient housing is made possible through the volunteer efforts of interns who come to Moab from across the country. While gaining skills in bale building and natural materials, the labor of the interns reduces the cost of construction thus enabling the building of affordable, straw bale homes for qualified families.

Scott contacted Emily Niehaus (the executive director) asking if she could recommend any of her former interns to help us complete our project. And here they are...our two very welcome employees, Cali and Jerry. With their help, all of that dust and straw will quickly disappear.


Cabinet Nailers

In conventional construction, there are plenty of ways to attach cabinetry and other necessary fixtures to walls. Those ways are called two-by-fours which are used to build the frame of the house. In our straw bale house, there are no two-by-fours. So how do you connect cabinets to walls when the only material available is straw covered with plaster? The answer is “nailers.”

Before plastering the kitchen wall, Scott inserted nailers along the south wall at the height required by our cabinet maker.

Scott began by using the chain saw to cut notches in the bale wall at the specified height.

He then made large (8-inch by 5-inch) triangular spikes out of plywood and screwed short lengths of two-by-fours to each spike. This is the “nailer" which Scott forced into its chain saw notch.

In order to secure each nailer in place, Scott screwed it into the nearest bamboo pole.

Before plastering over the nailers, we made a photo record of their location and height. We now have a very sturdy support system for our soon-to-be-completed (fingers crossed) cabinets.